| THIS IS A COMMUNITY PAGE IT IS OPEN TO EDITS FROM ANYONE |  |
This is a guide for setting up and playing War Robots on your PC via MEmu, a free Android emulator, or Bluestacks. If you already have an existing account on an Android device, you can follow these instructions to sync your account over to your PC. It is advised that you try Custom Games to get used to playing on pc so your ratings and average damage are not effected.
At the momemt this works for Android players only. Sorry iOS user. If there is a iOS solution in the future we will update the page.
Before starting[]
Please note that playing with a keyboard and mouse is officially allowed. See Thread:71373 for details.
*user openpilotcc3d warning : (your pc needs virtualization vx-t to run emulator smoothly. without this, it may not run or not be stable)
Android emulators are inefficient, and require a computer several times as powerful than a phone or tablet to play WR at the same frame rate. WR is a fairly demanding game, so if your computer is very old, chances are that it will run WR at mediocre frame rates (10-15 fps), so don't be surprised if you find it harder to aim with certain weapons (such as the Orkan); especially in intense battle situations. As a rule of thumb, your accuracy will be proportional to your frame rate.(however, a new method using remix os is on below, which runs smoothly even on old pcs)
With that being said, the game should be perfectly playable on modern PCs, likely running even smoother than on a comparably recent Android device. You might also find it convenient for things like managing your hangar and typing in clan chat, etc.
IMPORTANT NOTE
If you are already playing WR on your phone, you will want to sync your current progress on your phone to WR on your PC. To do this, make sure you have your Google Play Games account set up on your phone before you proceed.
Setup MEmu / Bluestacks[]
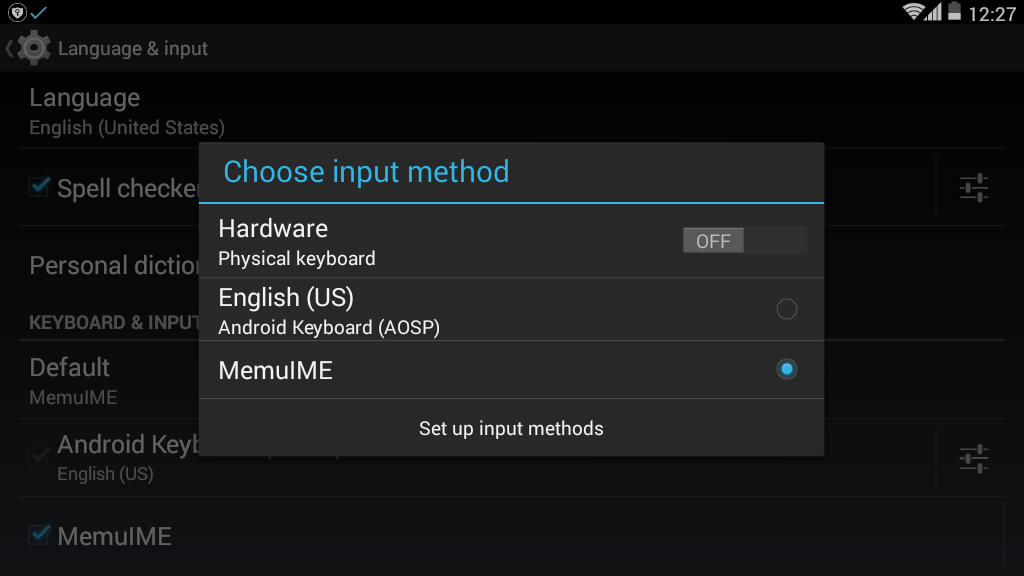
AS OF UPDATE 3.8 MEmu FACES AN ISSUE RUNNING WAR ROBOTS. The issue is the absence of the movement button on screen. This can be corrected by going to MEmu settings/language and input/keyboard and input methods/DEFAULT/ hardware>OFF.
Download MEmu and install it. Then log in with your Google account, making sure to use the same one on your Android device if you want to sync your WR progress. Run Google Play Games application within MEmu environment to make sure.
Bluestacks 4
- Go tp the gearwheel on the ground to open more settings.
- Open IME Settings.
- Activate screen keyboard.
Install WR and sync progress[]

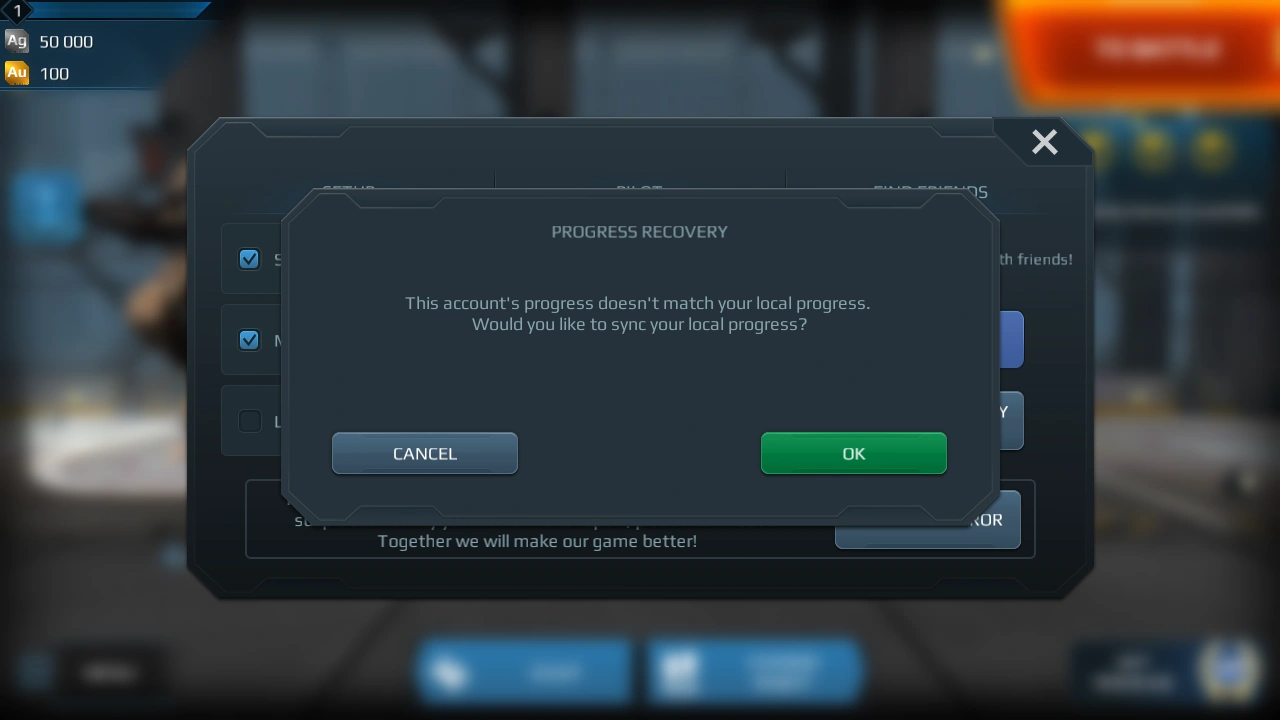
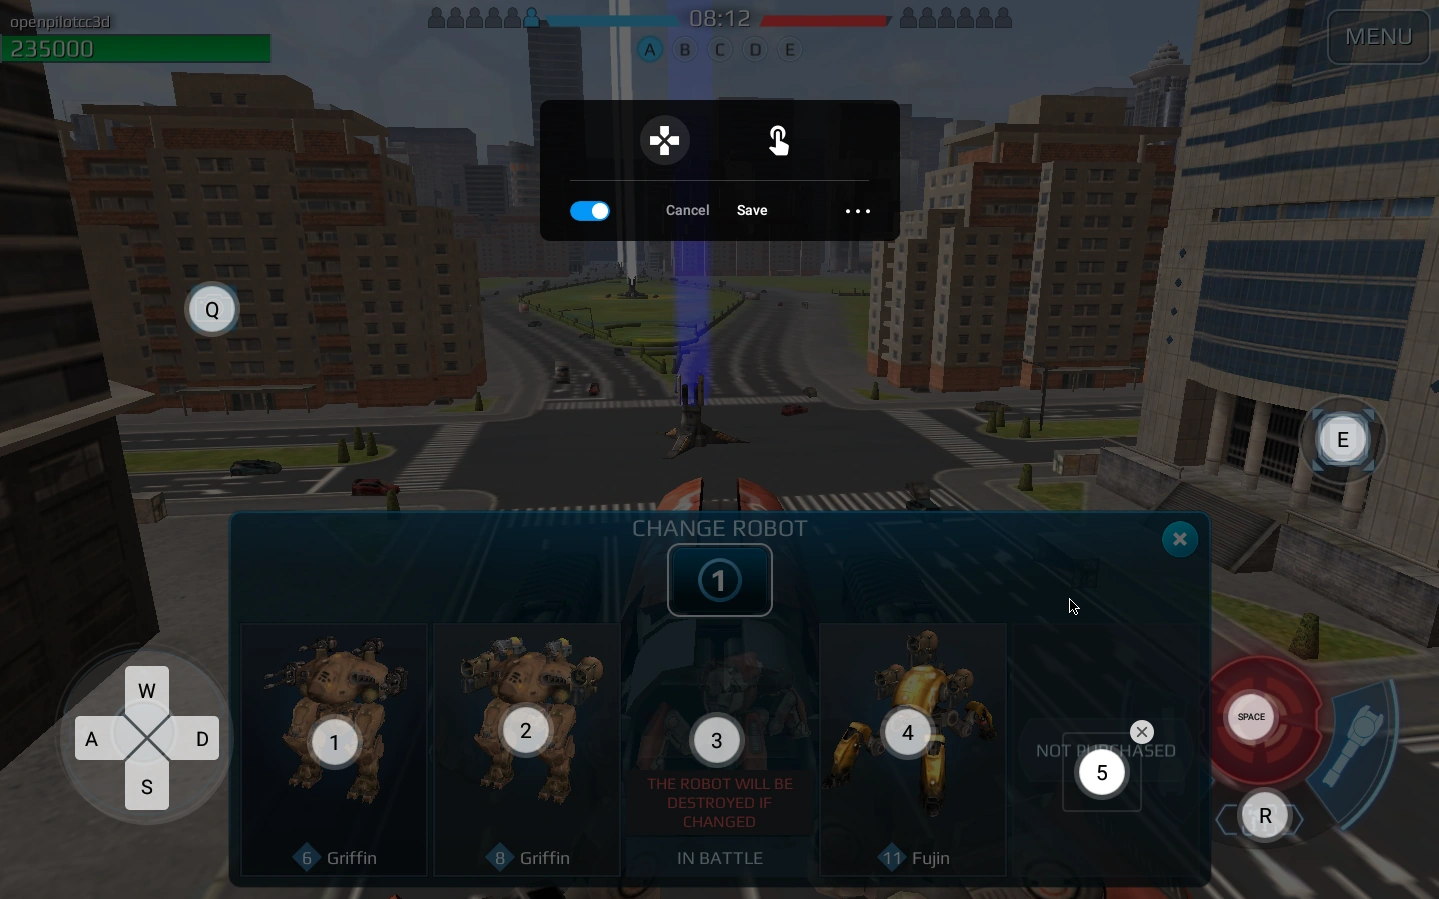
Search for the game, and download and install and run it. Click Menu button in WR then click "Google Play Games" button. A dialog will come up asking if you want to sync your local progress. Press OK if you want to use your existing account and cancel if you want to start over a new account.
IMPORTANT NOTE
Check the screenshot above and make sure it is the same as the one you get when you press "Google Play Games". Some people have sync'd their new profile onto their existing one by mistake and lost all their progress in the game. If the message is different, then make sure you have done the following before clicking "Google Play Games" button.
- You have setup your Google Play Games account on your phone.
- You have setup your Google Play Games account on your MEmu environment.
If you lose all of your progress in the game, you will need to contact Pixonic with the following information.
- The nickname that was used (please, provide the exact spelling including all symbols, small and capital letters).
- Your hangar level
- The approximate amount of your silver, gold and Workshop points
- Number of slots unlocked in your hangar
- Data about your active robots (robots & their levels, weapons equipped & their levels). Please be as detailed as possible so we can assure we find the correct account.
SET UP CONTROLS[]
In order to play WR on your computer effectively, you'll need to use your mouse to aim (right click to lock/unlock the cursor) and your keyboard to control everything else. Both Bluestacks and MEmu have GUI's for customizing controls. One important difference is that MEmu allows you to aim without holding down the mouse button, which may not seem like much but definitely helps over the course of a 10 minute match.
It is also possible to play with a controller. Just map your controls as shown below and use "JoyToKey" to assign the keys.
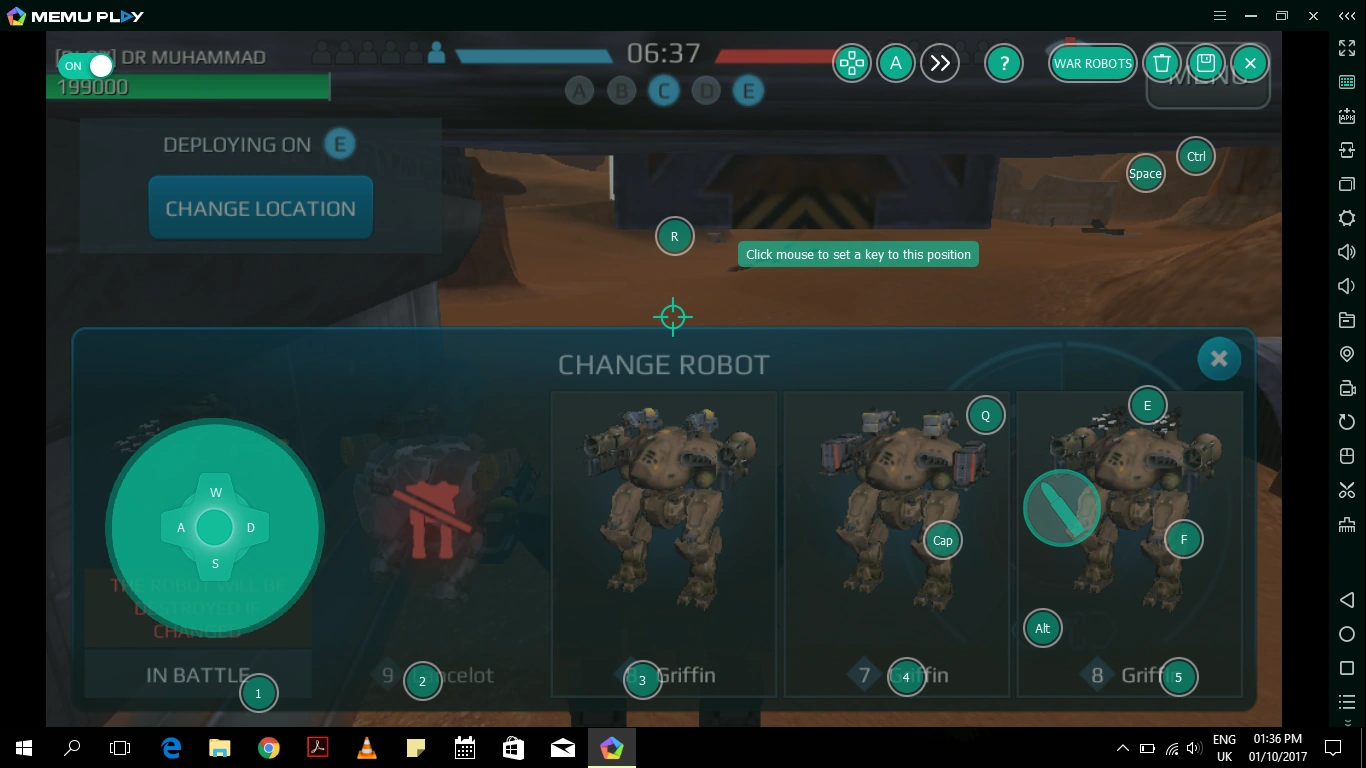
(1) SET UP CONROLS FOR MEmu[]
This is an example setup for MEmu: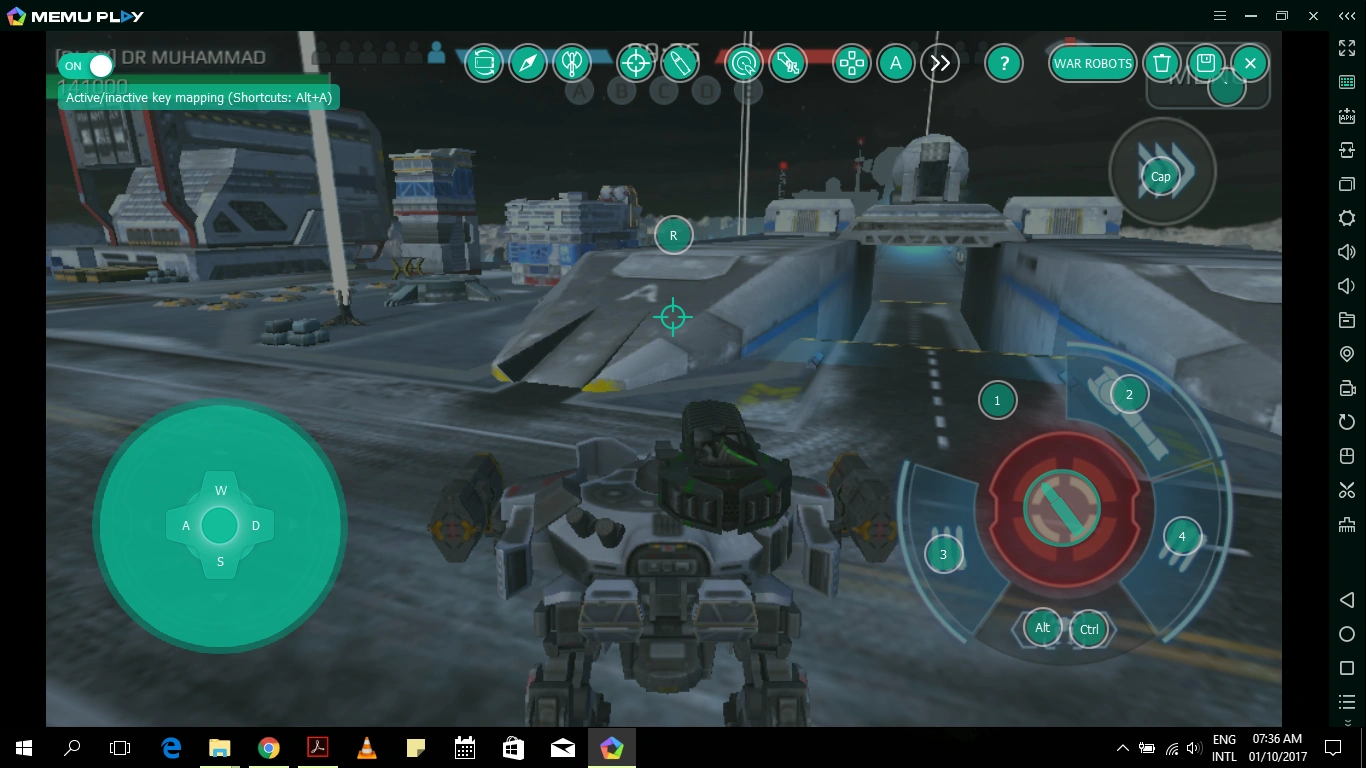
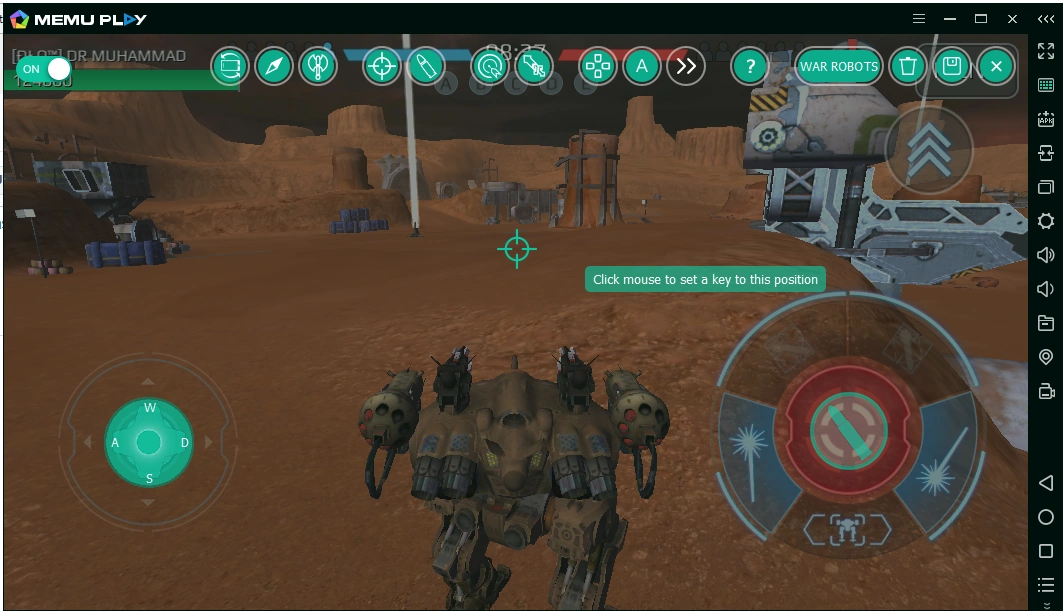
Here's another example setup for MEmu:
STEPS FOR SETTING UP CONTROLS[]
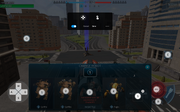
- Open war robots in MEmu and start a battle.(Recommended use Custom Games)
- Open key mapping option on toolbar
- NEVER FORGET TO CLICK 'SAVE' AFTER MAPPING KEYS OR YOU WILL HAVE TO START ALL OVER.
You need 3 basic things to control your bot
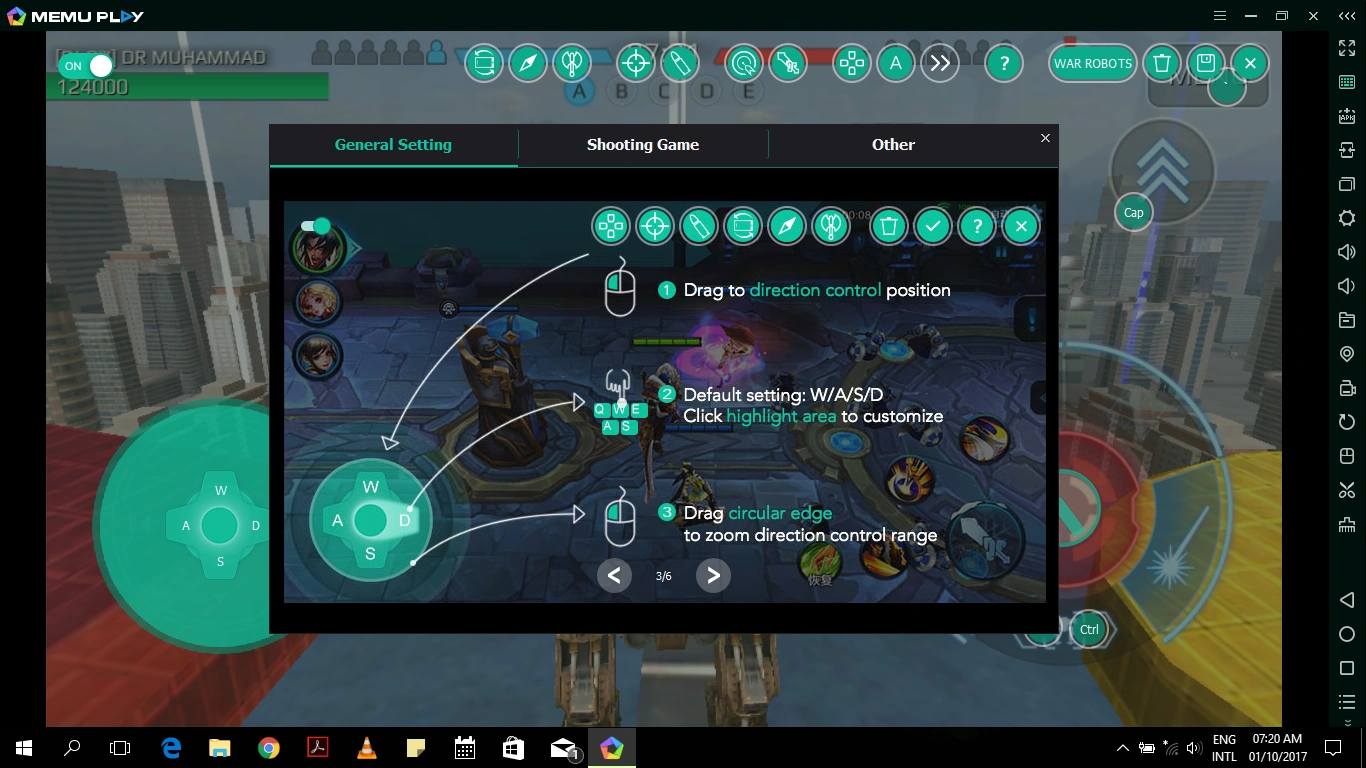
1.Robot movement= WASD PAD>>>> Keyboard[]
default robot movement is by the Arrow keys.....page up;page down;home;end(without use of game pad)
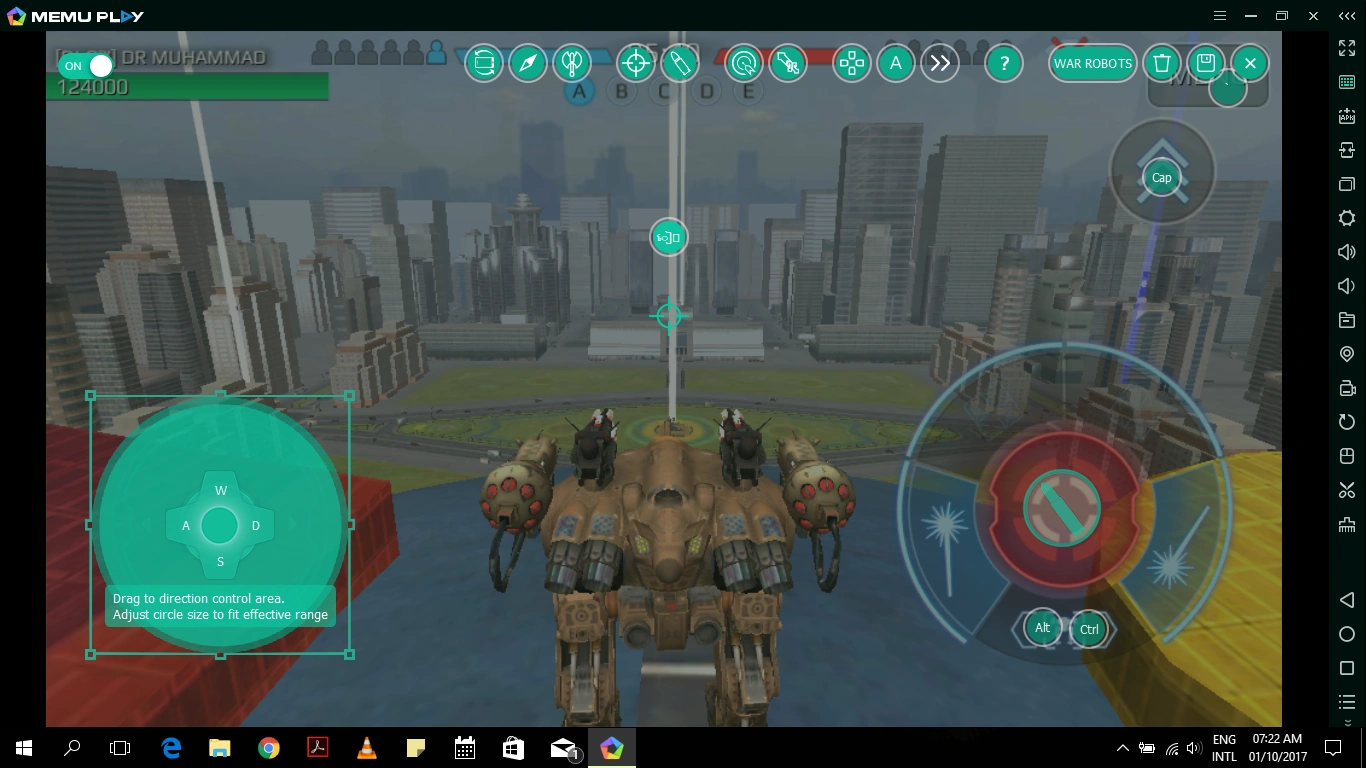
- Drag the DIRECTION CONTROL pad and place it where the button for bot movement is in game.
- Make sure that it is the same size or larger for optimum results(smaller pad will result in slow movement)
- Click each key to configure it(default is WSAD)
- SEE BUG FIXES FOR MEMU for known issues and how to fix
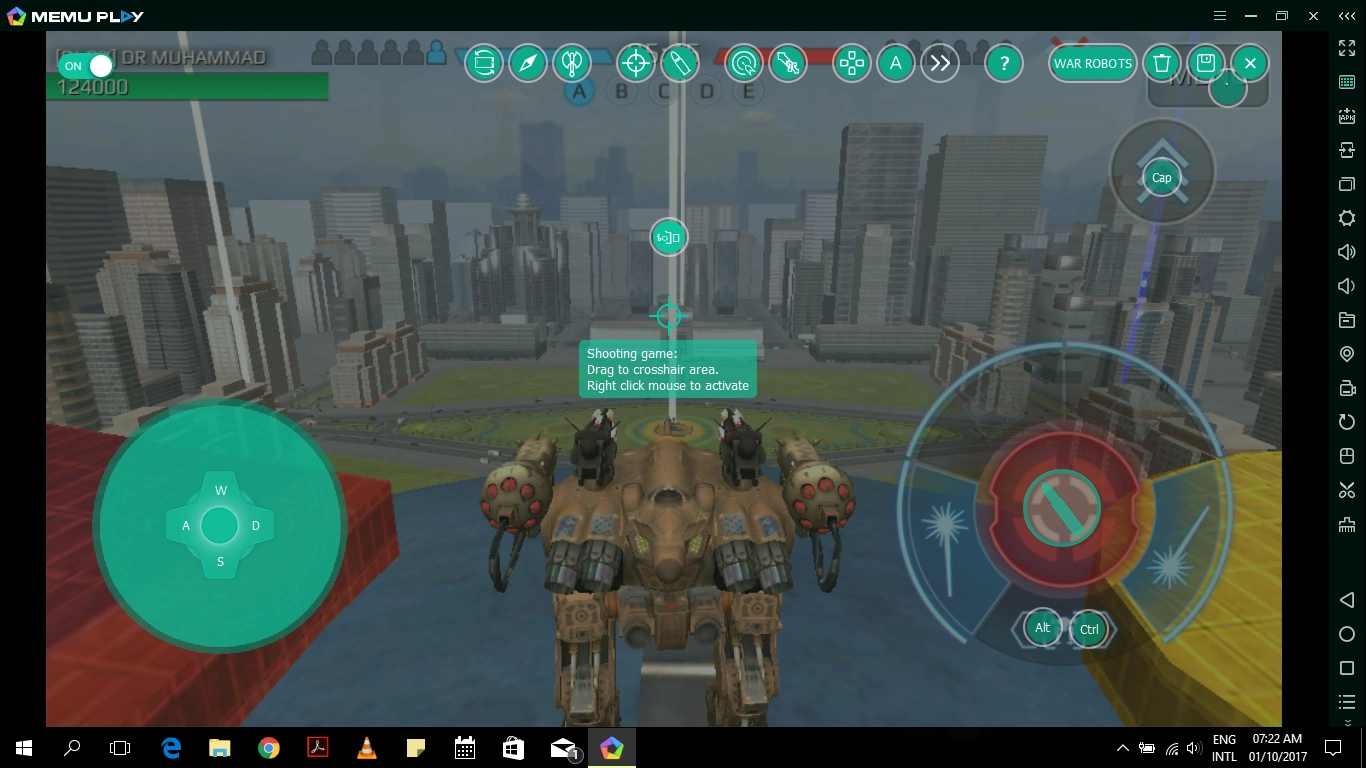
2.Robot turning=CROSSHAIR ICON → Mouse[]
- Drag CROSS HAIR from top and place it in centre or top of the screen.
- Right clicking it will switch between 'normal mouse controls and 'turning robot via mouse
- Remember for selecting anything on screen you need to 1st right click so you can use mouse but please note that during that time your bot cannot turn… (pretty much like a Rhino in assault mode!!)

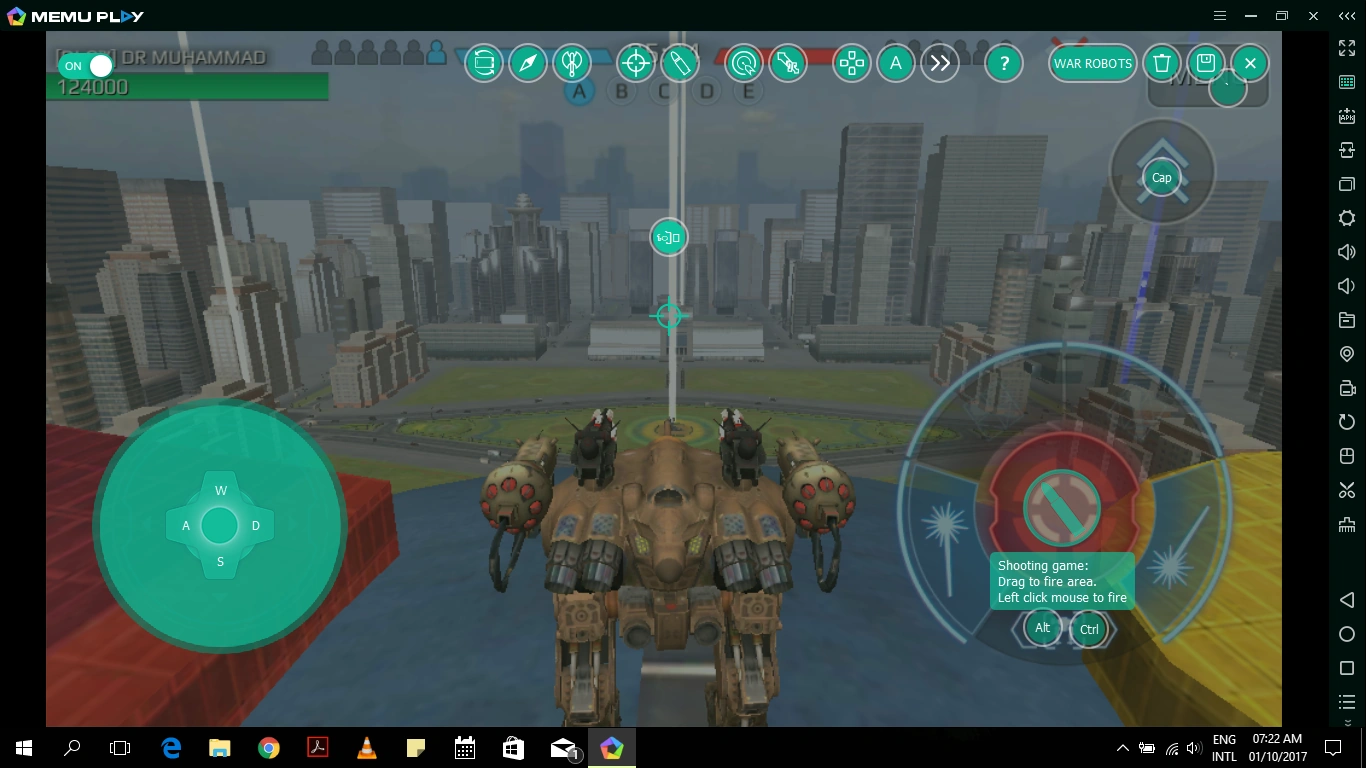
3.Weapons firing=TRIGGER BUTTON → Left Mouse Button[]
- Drag the SHOOT ICON from top and place it on the red button for FIRING ALL weapons
- Activated by Left mouse click(can be configured)
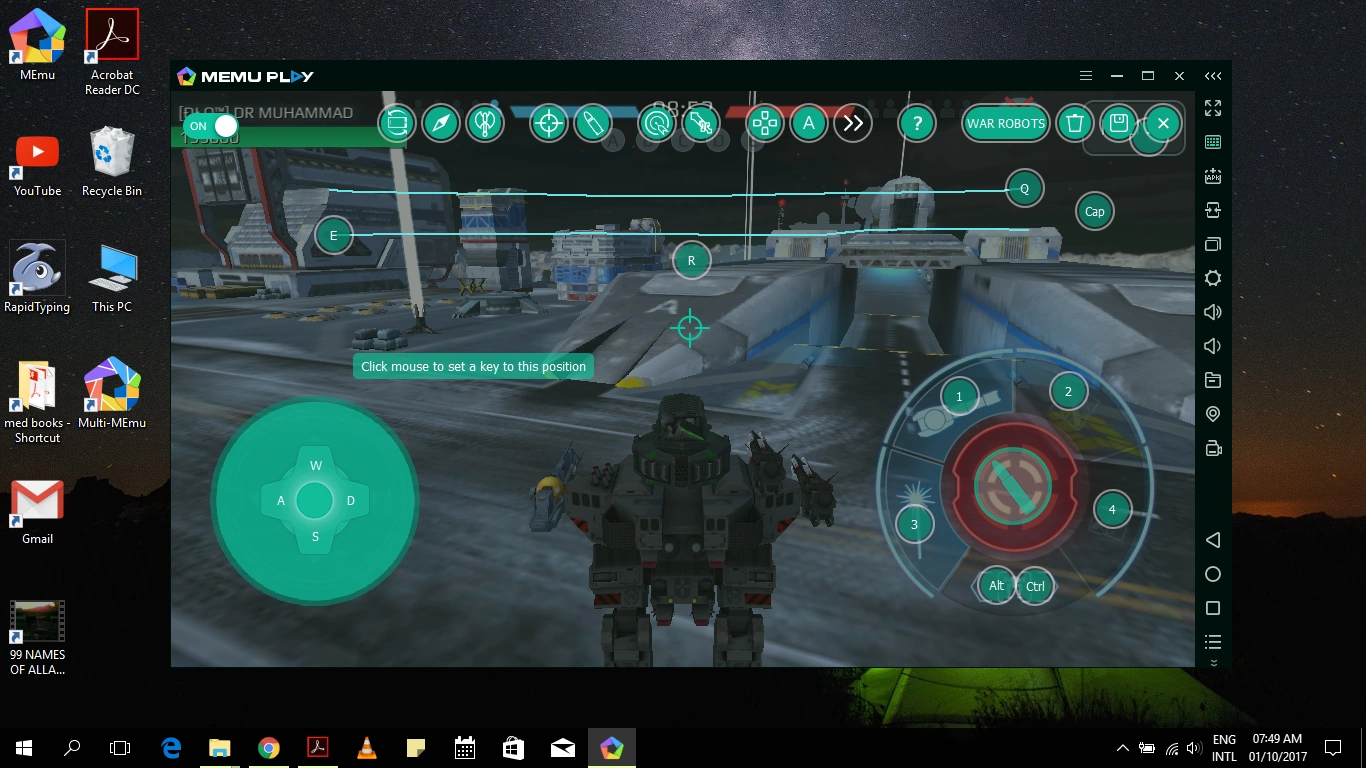
Advance SETUP[]
- This is done by assigning different keyboard keys some specific function on emulator screen

- You just have to click an area and a button will appear on screen then just select desired keyboard key to do its job....(then you can drag it to specific point) For example; using Cap for activating ability of robot ;or Alt for LOCK ON, etc.
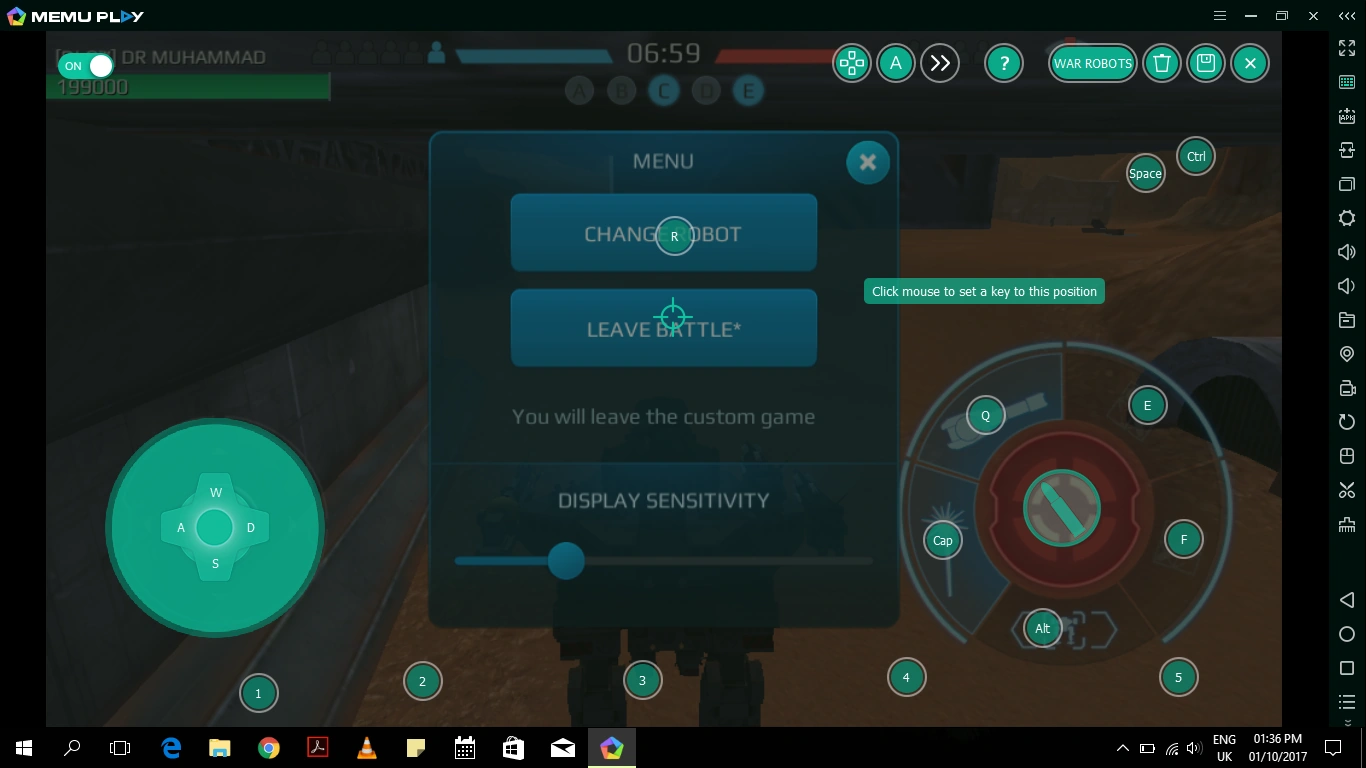
- You can customize this as much as you want like separate keys for separate shooting;corner shooting; opening the menu; selecting new robots
- You can also draw a line by dragging the mouse cursor to specify a quick swipe...in doing so can do a 180'turn just by a press of a button.So movements which require skill in android are mere pushes of buttons in emulator provided your placement is correct.
(2) Set Up Controls for Bluestacks[]
You can do pretty much the same thing in Bluestacks, or if you're extra lazy then just navigate to the following file and open it in a text editor:
C:\ProgramData\BlueStacks\Engine\UserData\InputMapper\com.pixonic.wwr.cfg
and replace everything with this and save:
{
  "MetaData": {
    "ParserVersion": "13",
    "KeyboardLayout": "German"
  },
  "Primitives": [
    {
      "$type": "Dpad, Bluestacks",
      "X": 9.37,
      "Y": 80.37,
      "XRadius": 6.13,
      "KeyUp": "W",
      "KeyUp_alt1": "",
      "KeyDown": "S",
      "KeyDown_alt1": "",
      "KeyLeft": "A",
      "KeyLeft_alt1": "",
      "KeyRight": "D",
      "KeyRight_alt1": "",
      "GamepadStick": "",
      "XRadius1": 0.0,
      "XRadius2": 0.0,
      "Speed": 200.0,
      "ActivationTime": 0,
      "ActivationSpeed": 0.0,
      "ShowOnOverlay": true,
      "Type": "Dpad",
      "Guidance": {
        "KeyUp": "Move forward",
        "KeyDown": "Move backward",
        "KeyLeft": "Move left",
        "KeyRight": "Move right"
      },
      "GuidanceCategory": "Movement",
      "Tags": [
        "Layout 1"
      ],
      "EnableCondition": "",
      "IsVisibleInOverlay": true
    },
    {
      "$type": "Pan, Bluestacks",
      "X": 49.8,
      "Y": 34.65,
      "KeyStartStop": "MouseRButton",
      "KeyStartStop_alt1": "GamepadLTrigger",
      "KeySuspend": "",
      "KeySuspend_alt1": "",
      "LookAroundX": -1.0,
      "LookAroundY": -1.0,
      "KeyLookAround": "V",
      "LButtonX": 88.28,
      "LButtonY": 79.06,
      "Sensitivity": 0.3,
      "Tweaks": 0,
      "SensitivityRatioY": 1.0,
      "ShowOnOverlay": true,
      "MouseAcceleration": false,
      "Type": "Pan",
      "Guidance": {
        "KeyStartStop": "Enter shooting mode",
        "Sensitivity": "Mouse sensitivity",
        "KeyAction": "Shoot"
      },
      "GuidanceCategory": "Aim and shoot",
      "Tags": [
        "Layout 1"
      ],
      "EnableCondition": "",
      "IsVisibleInOverlay": true
    },
    {
      "$type": "Dpad, Bluestacks",
      "X": 11.41,
      "Y": 76.54,
      "XRadius": 6.0,
      "KeyUp": "W",
      "KeyUp_alt1": "",
      "KeyDown": "S",
      "KeyDown_alt1": "",
      "KeyLeft": "A",
      "KeyLeft_alt1": "",
      "KeyRight": "D",
      "KeyRight_alt1": "",
      "GamepadStick": "",
      "XRadius1": 0.0,
      "XRadius2": 0.0,
      "Speed": 200.0,
      "ActivationTime": 0,
      "ActivationSpeed": 0.0,
      "ShowOnOverlay": true,
      "Type": "Dpad",
      "Guidance": {
        "KeyUp": "Move forward",
        "KeyDown": "Move backward",
        "KeyLeft": "Move left",
        "KeyRight": "Move right"
      },
      "GuidanceCategory": "Movement",
      "Tags": [
        "Layout 2"
      ],
      "EnableCondition": "",
      "IsVisibleInOverlay": true
    },
    {
      "$type": "Pan, Bluestacks",
      "X": 76.1,
      "Y": 46.72,
      "KeyStartStop": "F1",
      "KeyStartStop_alt1": "",
      "KeySuspend": "Alt",
      "KeySuspend_alt1": "",
      "LookAroundX": -1.0,
      "LookAroundY": -1.0,
      "KeyLookAround": "V",
      "LButtonX": 86.47,
      "LButtonY": 76.74,
      "Sensitivity": 0.3,
      "Tweaks": 0,
      "SensitivityRatioY": 1.0,
      "ShowOnOverlay": true,
      "MouseAcceleration": false,
      "Type": "Pan",
      "Guidance": {
        "KeyStartStop": "Enter shooting mode",
        "KeySuspend": "Suspend shooting mode",
        "Sensitivity": "Mouse sensitivity",
        "KeyAction": "Shoot"
      },
      "GuidanceCategory": "Aim and shoot",
      "Tags": [
        "Layout 2"
      ],
      "EnableCondition": "",
      "IsVisibleInOverlay": true
    },
    {
      "$type": "Dpad, Bluestacks",
      "X": 10.32,
      "Y": 78.22,
      "XRadius": 6.0,
      "KeyUp": "W",
      "KeyUp_alt1": "",
      "KeyDown": "S",
      "KeyDown_alt1": "",
      "KeyLeft": "A",
      "KeyLeft_alt1": "",
      "KeyRight": "D",
      "KeyRight_alt1": "",
      "GamepadStick": "",
      "XRadius1": 0.0,
      "XRadius2": 0.0,
      "Speed": 200.0,
      "ActivationTime": 0,
      "ActivationSpeed": 0.0,
      "ShowOnOverlay": true,
      "Type": "Dpad",
      "Guidance": {
        "KeyUp": "Move forward",
        "KeyDown": "Move backward",
        "KeyLeft": "Move left",
        "KeyRight": "Move right"
      },
      "GuidanceCategory": "Movement",
      "Tags": [
        "Layout 3"
      ],
      "EnableCondition": "",
      "IsVisibleInOverlay": true
    },
    {
      "$type": "Pan, Bluestacks",
      "X": 74.39,
      "Y": 47.08,
      "KeyStartStop": "F1",
      "KeyStartStop_alt1": "",
      "KeySuspend": "Alt",
      "KeySuspend_alt1": "",
      "LookAroundX": -1.0,
      "LookAroundY": -1.0,
      "KeyLookAround": "V",
      "LButtonX": 86.96,
      "LButtonY": 77.46,
      "Sensitivity": 0.3,
      "Tweaks": 0,
      "SensitivityRatioY": 1.0,
      "ShowOnOverlay": true,
      "MouseAcceleration": false,
      "Type": "Pan",
      "Guidance": {
        "Sensitivity": "Mouse sensitivity",
        "KeyAction": "Shoot",
        "KeyStartStop": "Enter shooting mode",
        "KeySuspend": "Suspend shooting mode"
      },
      "GuidanceCategory": "Aim and shoot",
      "Tags": [
        "Layout 3"
      ],
      "EnableCondition": "",
      "IsVisibleInOverlay": true
    },
    {
      "$type": "Tap, Bluestacks",
      "X": 93.77,
      "Y": 46.43,
      "Key": "Space",
      "Key_alt1": "",
      "ShowOnOverlay": true,
      "Type": "Tap",
      "Guidance": {},
      "GuidanceCategory": "MISC",
      "Tags": [],
      "EnableCondition": "",
      "IsVisibleInOverlay": true
    },
    {
      "$type": "Tap, Bluestacks",
      "X": 88.2,
      "Y": 90.57,
      "Key": "E",
      "Key_alt1": "",
      "ShowOnOverlay": true,
      "Type": "Tap",
      "Guidance": {},
      "GuidanceCategory": "MISC",
      "Tags": [],
      "EnableCondition": "",
      "IsVisibleInOverlay": true
    },
    {
      "$type": "Tap, Bluestacks",
      "X": 76.25,
      "Y": 67.12,
      "Key": "Q",
      "Key_alt1": "",
      "ShowOnOverlay": true,
      "Type": "Tap",
      "Guidance": {},
      "GuidanceCategory": "MISC",
      "Tags": [],
      "EnableCondition": "",
      "IsVisibleInOverlay": true
    }
  ],
  "Schemes": [
    {
      "Tag": "Layout 1",
      "Selected": true,
      "TagDomain": ""
    },
    {
      "Tag": "Layout 2",
      "Selected": false,
      "TagDomain": ""
    },
    {
      "Tag": "Layout 3",
      "Selected": false,
      "TagDomain": ""
    }
  ],
  "Strings": {
    "en-US": {
      "Enter shooting mode": "Enter shooting mode",
      "Suspend shooting mode": "Suspend shooting mode",
      "Mouse sensitivity": "Mouse sensitivity",
      "Aim and shoot": "Aim and shoot",
      "Move forward": "Move forward",
      "Move backward": "Move backward",
      "Move left": "Move left",
      "Move right": "Move right",
      "Movement": "Movement",
      "Shoot": "Shoot"
    },
    "th-TH": {
      "Enter shooting mode": "เข้า Shooting Mode",
      "Suspend shooting mode": "ปิด Shooting Mode",
      "Mouse sensitivity": "ความละเอียดเมาส์",
      "Aim and shoot": "เล็งและยิง",
      "Move forward": "เคลื่อนไปหน้า",
      "Move backward": "เคลื่อนถอยหลัง",
      "Move left": "ซ้าย",
      "Move right": "ขวา",
      "Movement": "เคลื่อนที่",
      "Shoot": "ยิง"
    },
    "tr-TR": {
      "Enter shooting mode": "Atış Moduna Gir",
      "Suspend shooting mode": "Atış Modunu Askıya Al",
      "Mouse sensitivity": "Mouse Hassasiyeti",
      "Aim and shoot": "Nişan ve Ateş",
      "Move forward": "İleri",
      "Move backward": "Geri",
      "Move left": "Sol",
      "Move right": "Sağ",
      "Movement": "Hareket",
      "Shoot": "Ateş"
    },
    "es-ES": {
      "Enter shooting mode": "Activar modo Disparo",
      "Suspend shooting mode": "Suspender modo disparo",
      "Mouse sensitivity": "Sensibilidad del Mouse",
      "Aim and shoot": "Apuntar y disparar",
      "Move forward": "Avanzar",
      "Move backward": "Retroceder",
      "Move left": "Mover a la izquierda",
      "Move right": "Mover a la derecha",
      "Movement": "Movimiento",
      "Shoot": "Disparar"
    },
    "ko-KR": {
      "Enter shooting mode": "슈팅모드 시작",
      "Suspend shooting mode": "슈팅모드 일시중지",
      "Mouse sensitivity": "마우스 감도",
      "Aim and shoot": "조준하고 쏘기",
      "Move forward": "앞으로",
      "Move backward": "뒤로",
      "Move left": "왼쪽으로",
      "Move right": "오른쪽으로",
      "Movement": "움직임",
      "Shoot": "쏘기"
    },
    "pt-BR": {
      "Enter shooting mode": "Entrar no Modo de Tiro",
      "Suspend shooting mode": "Suspender Modo de Tiro",
      "Mouse sensitivity": "Sensibilidade do Mouse",
      "Aim and shoot": "Mirar e Atirar",
      "Move forward": "Mover para frente",
      "Move backward": "Mover para trás",
      "Move left": "Mover Para Esquerda",
      "Move right": "Mover Para Direita",
      "Movement": "Movimento",
      "Shoot": "Atirar"
    },
    "ru-RU": {
      "Enter shooting mode": "Включить режим стрельбы",
      "Suspend shooting mode": "Приостановить режим стрельбы",
      "Mouse sensitivity": "Чувствительность мыши",
      "Aim and shoot": "Прицел и стрельба",
      "Move forward": "Движение вперед",
      "Move backward": "Движение назад",
      "Move left": "Движение влево",
      "Move right": "Движение вправо",
      "Movement": "Движения",
      "Shoot": "Стрельба"
    },
    "fr-FR": {
      "Enter shooting mode": "Entrer en mode shooting",
      "Suspend shooting mode": "Suspendre le shooting mode",
      "Mouse sensitivity": "Sensibilité de la souris",
      "Aim and shoot": "Viser et tirer",
      "Move forward": "Avancer",
      "Move backward": "Reculer",
      "Move left": "Aller à gauche",
      "Move right": "Aller à droite",
      "Movement": "Déplacements",
      "Shoot": "Tirer"
    },
    "User-Defined": {
      "Enter shooting mode": "Enter shooting mode",
      "Suspend shooting mode": "Suspend shooting mode",
      "Mouse sensitivity": "Mouse sensitivity",
      "Shoot": "Shoot"
    }
  }
}
Gamepad Support[]
In addition to keyboard, you can control your Robots with a controller. Tutorial
Improving performance[]
First off, if you're not reaching a stable 30 FPS on MEmu, do yourself a favor and buy a computer that's younger than you are.(but before you buy a new computer, try the remix os method below first.) Until then, there are a few things you can do (in decreasing order of effectiveness):
- Enable virtualization in your BIOS/UEFI settings (here is one guide on how to do that).
- Reduce the resolution in the MEmu settings.
- Set the 8 CPU and 4 GB RAM templates in GLTools (see Improving Graphics for setting up GLTools)
- Close all other demanding applications on your computer to conserve processing power for WR.
- Increase the memory limit in options but make sure you don't set CPU higher than the number of physical cores on your machine
- For Windows 8+, if you've installed the Hyper-V feature, you'll need to turn it off prior to running MEmu / BS4. This will give something like 20x better performance. Here are some command scripts you can use to create. Bat files (run as admin) to help turning this on and off as needed (reboot required)
- Hyper-V Off:
sc config vmms start= disabled
bcdedit /set hypervisorlaunchtype off
pause
shutdown /r /t 0
- Hyper-V On
sc config vmms start= auto
bcdedit /set hypervisorlaunchtype auto
pause
shutdown /r /t 0
Congratulations! You can now play WR on your computer and crush all those tablet noobs!
Improving Graphics [outdated][]
MEmu 6 (or newer) and Bluestacks 4 (or newer) runs with open GL 3.1.
All effects for improving graphics are allready on. You can downgrade your graphics with using a older open GL Version. With GLTools you can select your open GL version.
1. Download and install GLTools on MEmu. Link: http://rgho.st/private/7HLBZXbr2/9069d63c2e960745f089c488b949b7b6
2. Open GLTools, go to WR, check "Enable custom settings" and "Use fake GPU info" and set "Use a template">"Mali-T760"
3. It's also recommended to set the 8 CPU and 4 GB RAM templates to improve performance
Better performance on Bluestacks[]
Advanced Graphic Engine Off
CPU Cores x2 (BS4 needs only 2 Cores for best performance. You can try this on MEmu too.)
Ram 2048MB (2GB) or higher
By default War Robots runs only with 30 FPS.
With BS 4.80.0.1060 or newer you can run WR with 60FPS.
- Go to "Settings "
- Click on "Engine"
- Check the box "Enable High Frame Rate"
Set the regulator to 120 FPS (or higher but it's useless and its only costs more resources.)
Now War Robots runs with 60FPS. Its makes your game smother and less laggy.
Notice:
If you don't have 60 FPS, maybe your PC have not enough power.
If this happens, undo the settings.
Bug fixes for MEmu[]
- You should also turn off notification sounds in the emulated settings (or no in-game sound after an invite).
- IN CASE THE WASD PAD IS NOT RESPONDING DURING GAME, RESTARTING GAME WILL FIX THE PROBLEM ;IF THAT DOES NOT WORK DELETE AND REPASTE THE WASD PAD… but what will you do during battle when you are stuck helpless? Simple… Use the page up and down keys and home and end keys to move your robot.(default movement)
- If your controls are stuck at a slow pace, then quickly tap a WASD control while holding down the stuck key and you should return to a normal pace. (ie. WA if W key is stuck)
- If the WASD keys get stuck in one direction in the middle of a battle, open the keymappings and re-save them. Then press one of the keys assigned other than the WASD that is stuck (i.e. "1" for fire primary weapon or D if W is stuck). It should reset the key mapping and you will be able to move around again.
Recording Gameplay[]
Bluestacks 4 Update 4.120.0.1040 have now a screen recording option. Click on the right toolbar on the camcorder icon to Start / Stop recording your Game.
Nvidia graphics card user have on board tool:
Alt + F9 to start and stop recording
Alt + Z for settings
remix os method [outdated][]
====================================================================================
Remix os is shut down 2017 by the devs. No more updates or bugfixes.
(in development, remove this sentence when alot of people prove it works on multiple platforms. Tested on my computer, but still)
Second Method
*warning* this method might cause undetected bugs, and you cannot blame the wiki for your rank getting lower.(because you can sometimes lose from bugs that rarley happen)
Introduction
This guide will tell you how to play War robots on pc. unlike emulators, This method will teach you how to use remix os, a fully operated operating android system, which works on old pcs and is faster then any emulator.
(this only works for android too....)
Why remix os?
Remix os is a FULLY OPERATED SYSTEM, which means it can focus on android os, unlike
Emulators that work inside other os. → means faster performance
Pre check
→ your cpu need at least 2 ghz clock speed to work smoothly (tested)
→ 2GB RAM is minimum to (safely) run war robots, or else you app can crash during the game ):
→ GPU that has better clock speed then 267 mhz * 533mhz will work fine (tested)
→ usb bootable bios for usb booting(optional) or cd/floppy disk bootable bios(needed)
→ google account
- that is the max gpu speed galaxy s2, however even a overclocked s2 is not good for gaming
1.Go to remix website and download the bit version that works to your computer.
(if your computer is a 64bit system, you can use 32 bit too, but 64bit is more faster.)
(try 32bit version if you are not sure, but just search about how to view your operating system information)
2.after you downloaded the file, uncompress (if you don’t error happens) it and start the program that says
Remix_OS_for_PC_Installation_Tool-somethingsomething(numbers)
For usb installation
And follow instructions.
Read the text → How_to_launch_Remix_OS_for_PC for detailed information
3.pick your drive.
hdd/ssd→ this will make your system in to a dual boot system, but microsoft (claim) they don’t support this… usually faster boot (will make your system as dual boot)
usb→ this will make your system as a portable android system, but will be slow to boot
Usb 3.0 recommended
Both need at least 8gb of free disk space.
(But I believe 4gb is enough to run war robots only)
4. If you want to dual boot.. (if you're not a tech guy, go to usb method)
!warning! This method is more complicated then usb method.
https://www.hitricks.com/guide-how-to-dual-boot-remix-os-with-windows-uefi-legacy
(The XDA forum link is disabled)
For linux/windows dual booting users
for triple boot windows android linux
https://forum.xda-developers.com/android/general/guide-triple-boot-android-ubuntu-t3092913
That will help you
5.usb method
Use the exe program in the extracted file. Program I showed you above and select usb disk in “type” option
And select the usb disk you want to use
Follow the instructions that is displayed on the program
6.booting from usb
Turn on your computer, hit f12 when you see your computer company logo (usually the boot option) or the key the navigates you to the boot option.
If you fail, restart, and try again.
Press “enter” and use key arrows to pick options. Pick persistent mode to keep your data
(or resident mode)
7. Be patient
Now you will see the remix os logo fading/and reappearing.
The first, second, third boot up process is usually slow you should wait up to 1 hour if you used a slow usb.
Now enjoy!
Using remix os.
As your remix os boots up, login using your war robots google account.
This is same as the setup for a new phone.
2. As you finish your setup process, go to menu (down left corner) and click “play activator”
And restart your computer.
3. After you restart your computer, go to menu again and open play store and download war robots & google play games (for sync)
4.key mapping is similar to memu, so the guide of memu will help you
Gaming tool kit, the key mapper
Key mapping
You should use the default game kep mapper inside remix os
Search through the internet for information
Setup example
Use your imagination to get the perfect keymap control for you.
How to take screenshots
1.install screenshot easy from playstore
2.after installing, open the app, and select allow the app to have superuser permission and permission to access to files
3.after that, select “overlay icon” and is select others
4. Press “start capture”
5. Now, you will have a overlay icon that look like this
6.use your key mapping tools so you can take a screenshot using your keyboard
7.after you finish the game, open screenshot easy again and press “stop capture”.
Screen recording
You can basically use any app that is on playstore, but I personally like AZ screen record.
Tip for gaming
1.Don’t use the WASD key when you don’t need to(ex when jumping in mid air or bastion mode or sentry etc)
Your controls are most likely to get stuck when you use them for a long period
2. If your controls get stuck, don’t panic! Just release the every control( including WASD joystick )for a half second and start controlling again
3. Cpu monitor are good tools. This tool will help you to not burn your cpu.(I mean old hardware)
4.If your computer is old, then do not play the game while updating other apps ---> your OS can crash (you will not want that)
5.try custom games with your friend until you can react to the control-getting-stuck (let's call it “CGS” ) in
short periods.
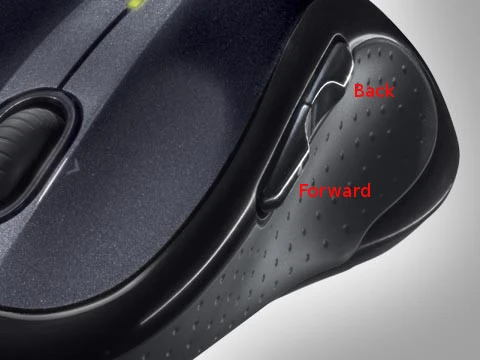
6.if your mouse has forward & back wards buttons, you can use back wards button as "back" in android.
Troubleshoot
Boot problem
Cannot boot from usb. not in options
Your bios is outdated or your computer is too old (does it run windows me on it?)
Fortunately, this can help.
https://www.plop.at/en/bootmanagers.html
Cannot boot from usb
Disable secure boot in your BIOS.
Change usb
Test it on different computer
3. No operating system (OS) found?!
Did you touch the files in the usb?
Format your usb and install it again
Try different usb
4.do not usb usb hub
Bios will not detect your usb
Bug problem
1.Sometimes the controls get jammed, so you will continue to move in the same direction, or you won’t be able to shoot. In this case, release the control for a second, and try to control it again /* probably related to the multi-touch limit */
2.if you look at the screen (large screen, more than 17 inch) you can see dead pixels in the screen sometimes, but this won't effect the game, so don't worry. /*probably related to max resolution limit.*/
Common problems
1.the screen rotation(mech rotation) is too fast
In settings goto language and input and change the mouse pointer speed
2.the robot rotates a little bit when I use WASD keys for movement joystick
sorry...I can’t help you with that
(but when you have mouse control when you press WASD buttons, this will not happen)
This bug disappears after you use it for a while
3.if you used usb to boot you will see a lot of notifications of “usb disk detected” leave them alone, never press eject.